Posted on 29 Dec 2023 . 4 min read
SwiftLint is a tool that ensures Swift code adheres to defined style guidelines. It automates code review by identifying and suggesting improvements for style violations. With configurable rules, it enforces consistent formatting, naming conventions, and code structure. Integrated into workflows, it boosts code quality, aiding in collaboration and maintaining a standardized codebase across projects.
SwiftLint is a fantastic tool for maintaining a consistent coding style in Swift projects. Here’s a basic guide to help you get started:
Installation:
1. Install using Homebrew.
brew install swiftlint
2. Install using CocoaPods (recommended).
Add the following line to your podfile:
pod 'SwiftLint'And execute the following command to download the SwiftLint binaries and dependencies:
pod install3. Install using Swift Package Manager (SPM).
Add to your Package.swift file's dependencies, and then add SwiftLint as a dependency of your target.
.package(url: "https://github.com/realm/SwiftLint.git", from: "x.x.x")Integrate SwiftLint with Xcode:
To get warnings and errors from the linting tool, you have to integrate SwiftLint with Xcode. To do so, follow these steps:
Using a Run Script:
- Open your project in Xcode.
- Select the project file inside the navigator.
- Select the primary app target and go to Build Phases.
- Click on the “+” icon and select “New Run Script Phase”.
- Paste the following into the script editor.
if which swiftlint >/dev/null; then
  swiftlint;
else
  echo "SwiftLint not installed, download from https://github.com/realm/SwiftLint";
fi
As soon as you build your project, SwiftLint will work.
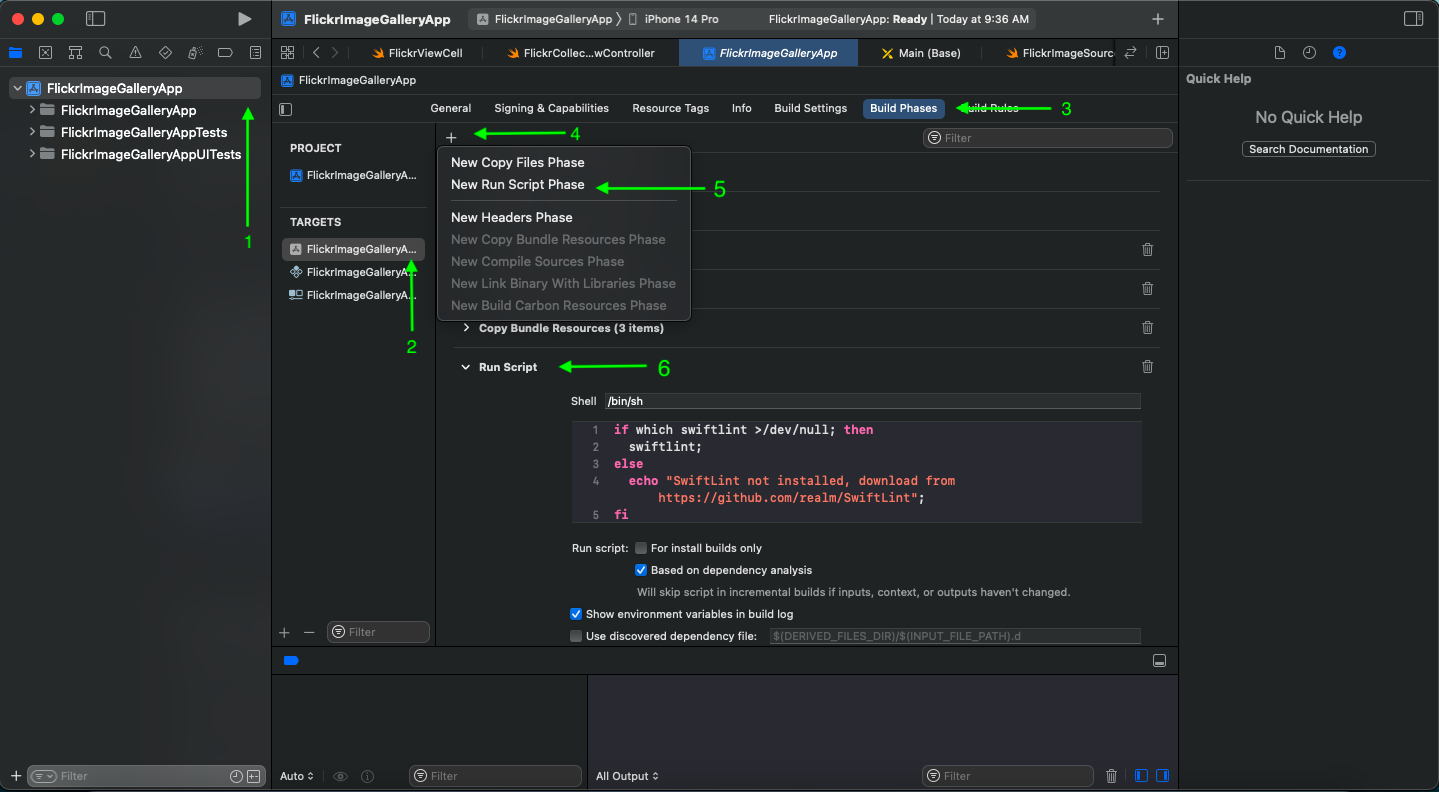
If you're unfamiliar with adding a "Run Script Phase" to your project target, here's an image you can use as a reference.
Configuration:
The rules are defined by the Swift community, which contributes over time. You can create a .swiftlint.yml file in the root directory of your project to enforce or disable rules according to your preferences. Here, you can specify rules, adjust severity levels, ignore certain rules for specific files or folders, etc.
To create a new .swiftlint.yml file, go to the project root folder and execute the following command:
cd YourProjectRootFolder
touch .swiftlint.yml
Open the .swiftlint.yml file to add or modify the rules.
# By default, SwiftLint uses a set of sensible default rules you can adjust:
disabled_rules: # rule identifiers turned on by default to exclude from running
  - colon
  - comma
  - control_statement
opt_in_rules: # some rules are turned off by default, so you need to opt-in
  - empty_count # find all the available rules by running: `swiftlint rules`

# Alternatively, specify all rules explicitly by uncommenting this option:
# only_rules: # delete `disabled_rules` & `opt_in_rules` if using this
#   - empty_parameters
#   - vertical_whitespace

analyzer_rules: # rules run by `swiftlint analyze`
  - explicit_self

included: # case-sensitive paths to include during linting. `--path` is ignored if present
  - Sources
excluded: # case-sensitive paths to ignore during linting. Takes precedence over `included`
  - Carthage
  - Pods
  - Sources/ExcludedFolder
  - Sources/ExcludedFile.swift
  - Sources/*/ExcludedFile.swift # exclude files with a wildcard

# If true, SwiftLint will not fail if no lintable files are found.
allow_zero_lintable_files: false

# If true, SwiftLint will treat all warnings as errors.
strict: false

# configurable rules can be customized from this configuration file
# binary rules can set their severity level
force_cast: warning # implicitly
force_try:
  severity: warning # explicitly
# rules that have both warning and error levels, can set just the warning level
# implicitly
line_length: 110
# they can set both implicitly with an array
type_body_length:
  - 300 # warning
  - 400 # error
# or they can set both explicitly
file_length:
  warning: 500
  error: 1200
# naming rules can set warnings/errors for min_length and max_length
# additionally they can set excluded names
type_name:
  min_length: 4 # only warning
  max_length: # warning and error
    warning: 40
    error: 50y  excluded: iPhone # excluded via string
  allowed_symbols: ["_"] # these are allowed in type names
identifier_name:
  min_length: # only min_length
    error: 4 # only error
  excluded: # excluded via string array
    - id
    - URL
    - GlobalAPIKey
reporter: "xcode" # reporter type (xcode, json, csv, checkstyle, codeclimate, junit, html, emoji, sonarqube, markdown, github-actions-logging, summary)
This example is from SwiftLint, so go ahead and make some changes. Go ahead and make the following changes to the file length: warning to 400 and error to 1100. This is a good example of how we can customize the rules.
file_length:
  warning: 400
  error: 1100
The bottom line
Remember that creating custom rules requires a good understanding of SwiftLint’s API and your project’s specific needs. It’s a powerful feature but should be used thoughtfully to enhance your code quality and maintainability.
For more detailed information and examples on creating custom rules, refer to the SwiftLint documentation and existing custom rule implementations.
Remember, SwiftLint is highly customizable, so take the time to configure it according to your project’s specific needs and preferences.
Don’t hesitate to contact me if you have any questions or queries. Follow me on twitter @gurjitpt for any updates.
Thanks!
Share this article
Written By

Gurjit Singh
I’m Computer Science graduate and CompTIA Security+ certified SOC Analyst and Mobile Application Security Engineer with 10+ years of cross-platform development experience across iOS, Android, and web.
Discover articles by topics
SwiftUI Class Struct Networking XCode NSCache Enum Optionals Property Observers Closures Guard Reviews StoreKit App Store Algorithms Testing Operators Protocol Extensions Weak Unowned SwiftData WWDC23 GCD API Admob SwiftLint Lottie Foreach Objective-C UIKit NavigationSplitView